Steam
Overview
This document explains the steps necessary to support an Ebitengine game on Steam. In order to release a game on Steam, it must undergo an approval process. To pass this review, simply building an Ebitengine game with Go is not enough. A variety of tasks are required. This article summarizes the items necessary to get an Ebitengine game approved. A general explanation of Steamworks is omitted.
In the following explanation, the game name is yourgame and the user name is Your Name, etc. Please adjust these as appropriate.
Steamworks SDK
Steam features include retrieving the user's language, unlocking achievements, and more. These features are accessed via the Steamworks SDK. Since the SDK's files are in the form of dynamic libraries (such as DLLs or .so files), some extra work is needed to use them from Go.
To address this, we have created a binding called go-steamworks. You can use it simply by importing it. However, on Windows, you must separately download and include the Steamworks DLL.
For example, the process of “restarting the application if it wasn’t opened via the Steam client” can be written as follows:
package main

import (
	"fmt"
	"os"

	"github.com/hajimehoshi/go-steamworks"
)

const appID = 480 // Use your application ID.

func init() {
	if steamworks.RestartAppIfNecessary(appID) {
		os.Exit(1)
	}
	if err := steamworks.Init(); err != nil {
		panic(fmt.Sprintf("steamworks.Init failed: %v", err))
	}
}
Please note that this binding has not yet implemented most of the API. More features are planned for future updates.
Windows
Windows is the simplest case, where you just build with Go normally. Since Ebitengine is Pure Go on Windows, you can build it anywhere by specifying GOOS and GOARCH.
There have been reports of an issue where Go applications freeze when running in the Windows Steam environment (#3181, golang/go#71242). As a workaround, please specify -ldflags="-X=runtime.godebugDefault=asyncpreemptoff=1" when executing go build. Additionally, in the steps below, the -H=windowsgui flag is added to prevent the console from opening at startup.
When building with PowerShell, it looks like this:
$Env:GOARCH = 'amd64'
go build -o yourgame_windows_amd64.exe -ldflags="-X=runtime.godebugDefault=asyncpreemptoff=1 -H=windowsgui" .
Remove-Item Env:GOARCH
When building in a POSIX shell, it looks like this:
env GOOS=windows GOARCH=amd64 go build -o yourgame_windows_amd64.exe -ldflags="-X=runtime.godebugDefault=asyncpreemptoff=1 -H=windowsgui" .Icons are not mandatory. If you wish, use a resource embedding tool as appropriate. During game execution, you can change the icon displayed in the taskbar by calling ebiten.SetWindowIcon.
Once the exe file is created in this manner, compress it into a zip file and upload it to Steamworks as a build.
macOS
On macOS, you need to create an application in the .app format. In addition, you must obtain notarization from Apple (Notarization). To receive notarization, you must be registered with Apple Developer.
In writing this article, I referred to the blog post “Releasing Steam Games on Mac Is a Monster Pain”.
First, prepare an icon file in the icns format. This format can be created simply by opening a PNG or similar in Preview.app and exporting it. If it does not appear in the export format list, hold down the Option key while opening the list.
Next, create the minimal .app as follows. For the architecture, create a universal binary for amd64 (Intel) and arm64 (ARM) using the lipo command.
name=yourgame
app_name=YourGame.app
bundle_id=com.example.yourgame

rm -rf ${app_name}
mkdir -p ${app_name}/Contents/MacOS
mkdir -p ${app_name}/Contents/Resources
env CGO_ENABLED=1 CGO_CFLAGS=-mmacosx-version-min=10.12 CGO_LDFLAGS=-mmacosx-version-min=10.12 GOARCH=amd64 go build -o ${name}_amd64 .
env CGO_ENABLED=1 CGO_CFLAGS=-mmacosx-version-min=10.12 CGO_LDFLAGS=-mmacosx-version-min=10.12 GOARCH=arm64 go build -o ${name}_arm64 .
lipo ${name}_amd64 ${name}_arm64 -create -output ${app_name}/Contents/MacOS/${name}
rm ${name}_amd64
rm ${name}_arm64
cp icon.icns ${app_name}/Contents/Resources/icon.icns
echo '<?xml version="1.0" encoding="UTF-8"?>
<!DOCTYPE plist PUBLIC "-//Apple Computer//DTD PLIST 1.0//EN" "http://www.apple.com/DTDs/PropertyList-1.0.dtd">
<plist version="1.0">
  <dict>
    <key>CFBundlePackageType</key>
    <string>APPL</string>
    <key>CFBundleInfoDictionaryVersion</key>
    <string>6.0</string>
    <key>CFBundleExecutable</key>
    <string>{{.Name}}</string>
    <key>CFBundleIdentifier</key>
    <string>{{.BundleID}}</string>
    <key>CFBundleIconFile</key>
    <string>icon.icns</string>
    <key>CFBundleVersion</key>
    <string>0.0.0</string>
    <key>CFBundleShortVersionString</key>
    <string>0.0.0</string>
    <key>NSHighResolutionCapable</key>
    <true />
    <key>LSMinimumSystemVersion</key>
    <string>10.12.0</string>
  </dict>
</plist>' |
    sed -e "s/{{.Name}}/${name}/g" |
    sed -e "s/{{.BundleID}}/${bundle_id}/g" > ${app_name}/Contents/Info.plist
Next, create an App ID (Bundle ID) on the Apple Developer Account page if one does not already exist.

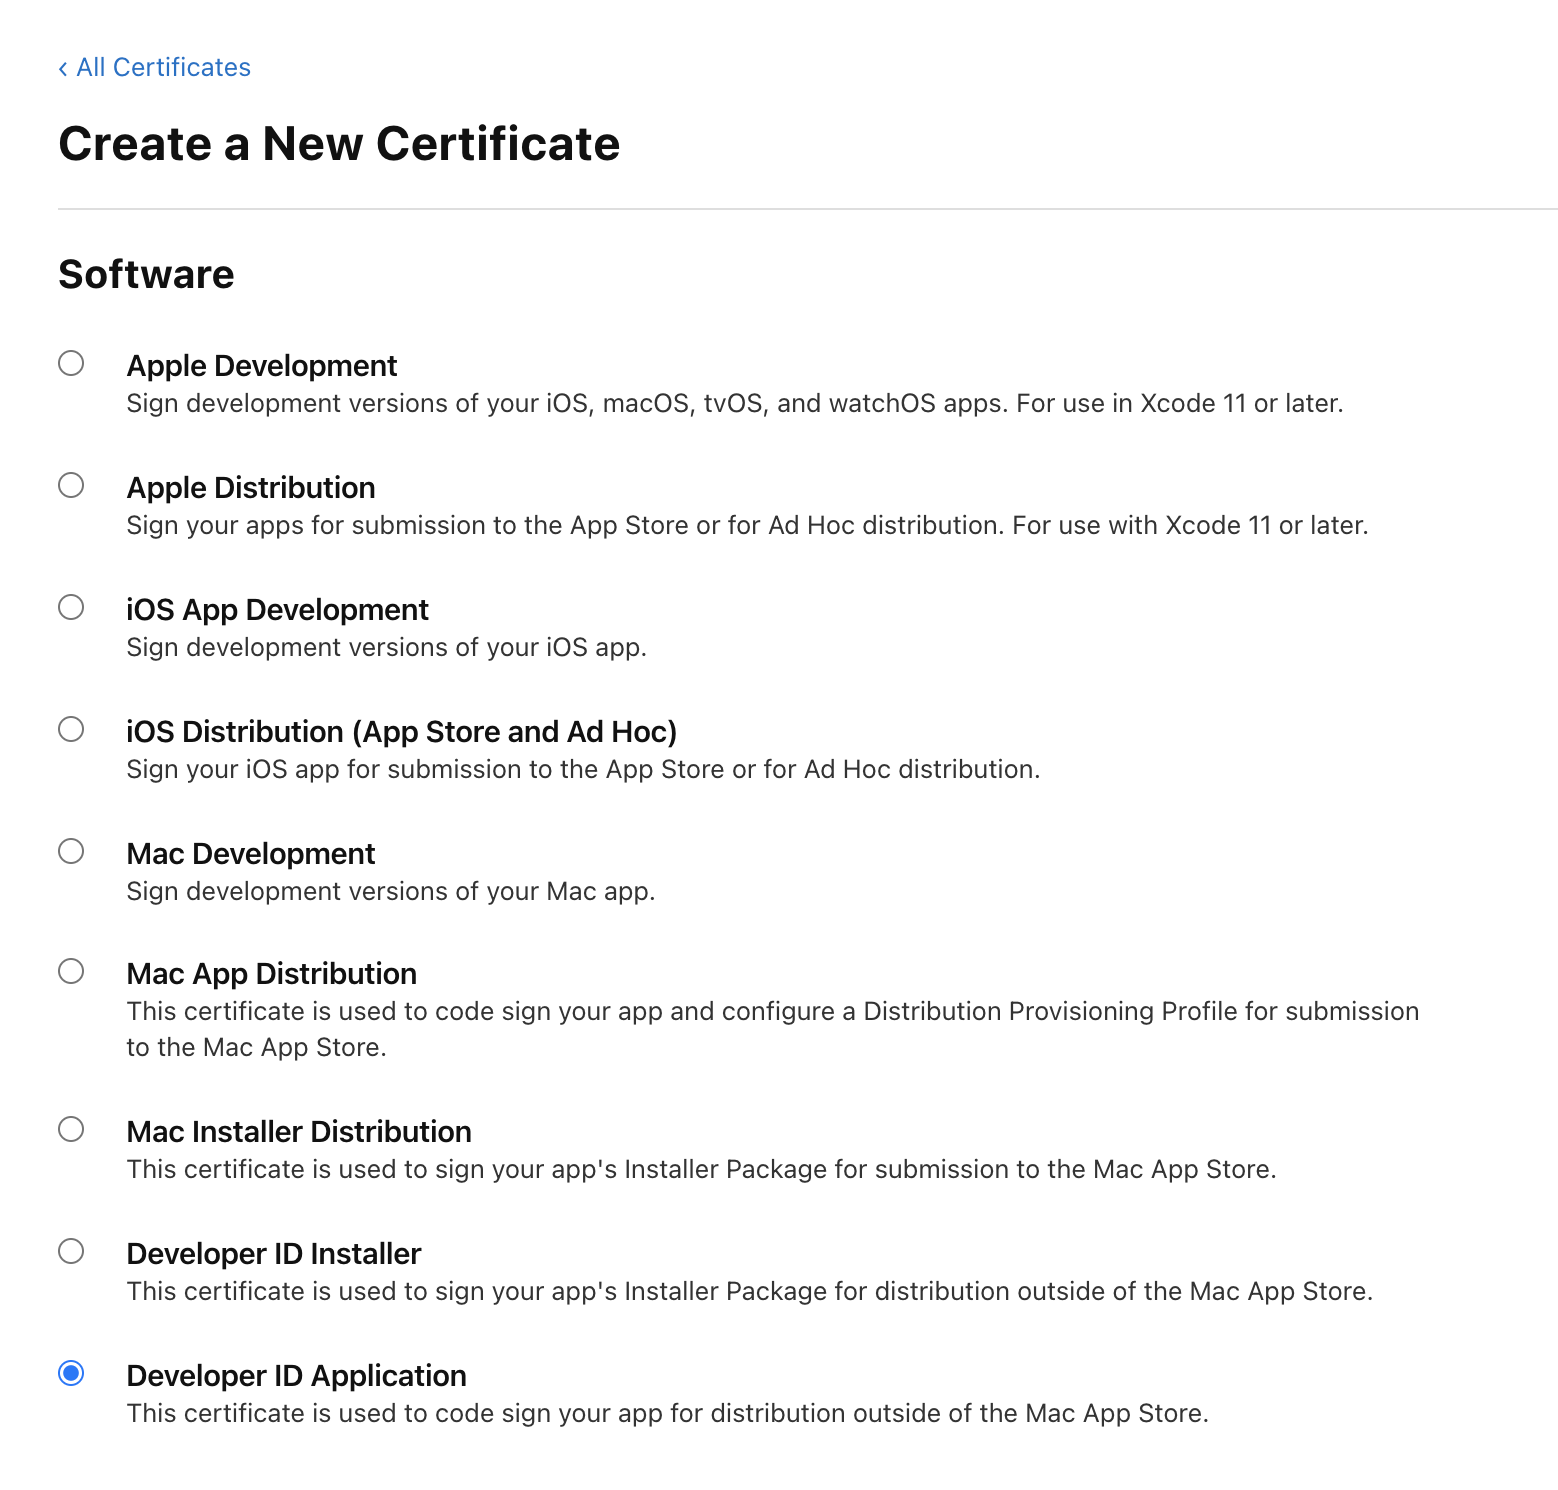
Then, create a Developer ID (Developer ID Application) Certificate on the Apple Developer Account page if you don’t already have one.
Next, create an App-Specific Password. This can be easily created from the Apple ID website. For details, please refer to Apple’s support page.
Now, notarize the app. We have created a library called notarize that handles the steps up to stapler for notarization. Below is an example of its usage.
package main
import (
"fmt"
"os"
"github.com/hajimehoshi/notarize"
)
func main() {
appPassword := os.Getenv("APP_PASSWORD")
if appPassword == "" {
fmt.Fprintln(os.Stderr, "an environment variable APP_PASSWORD must be set. see https://support.apple.com/en-us/HT204397")
os.Exit(1)
}
op := ¬arize.NotarizeOptions{
AppleID: "[email protected]",
SigningIdentity: "Developer ID Application: Your Name (YOURTEAMID)",
TeamID: "YOURTEAMID",
AppPassword: appPassword,
ProgressOutput: os.Stdout,
}
if err := notarize.Notarize("YourGame.app", op); err != nil {
fmt.Fprintf(os.Stderr, "%v\n", err)
os.Exit(1)
}
}When uploading the resulting .app to Steamworks as a build, do not create a zip file using the zip command or Finder’s menu. The notarized .app contains special files that will be lost if you create a zip in the normal way. Instead, use the ditto command to create the zip file.
ditto -c -k --keepParent YourGame.app yourgame_darwin.zipLinux
For Linux, Valve’s Steam Runtime is provided as a Dockerfile. Building in that environment is the simplest approach. As of January 2025, please refer to the Sniper Docker image. Note that 32-bit Linux does not appear to be supported.
name=yourgame
STEAM_RUNTIME_VERSION=3.0.20250108.112707
GO_VERSION=$(go env GOVERSION)

mkdir -p .cache/${STEAM_RUNTIME_VERSION}

# Download binaries for amd64.
if [[ ! -f .cache/${STEAM_RUNTIME_VERSION}/com.valvesoftware.SteamRuntime.Sdk-amd64,i386-sniper-sysroot.Dockerfile ]]; then
    (cd .cache/${STEAM_RUNTIME_VERSION}; curl --location --remote-name https://repo.steampowered.com/steamrt-images-sniper/snapshots/${STEAM_RUNTIME_VERSION}/com.valvesoftware.SteamRuntime.Sdk-amd64,i386-sniper-sysroot.Dockerfile)
fi
if [[ ! -f .cache/${STEAM_RUNTIME_VERSION}/com.valvesoftware.SteamRuntime.Sdk-amd64,i386-sniper-sysroot.tar.gz ]]; then
    (cd .cache/${STEAM_RUNTIME_VERSION}; curl --location --remote-name https://repo.steampowered.com/steamrt-images-sniper/snapshots/${STEAM_RUNTIME_VERSION}/com.valvesoftware.SteamRuntime.Sdk-amd64,i386-sniper-sysroot.tar.gz)
fi
if [[ ! -f .cache/${GO_VERSION}.linux-amd64.tar.gz ]]; then
    (cd .cache; curl --location --remote-name https://golang.org/dl/${GO_VERSION}.linux-amd64.tar.gz)
fi

# Build for amd64
(cd .cache/${STEAM_RUNTIME_VERSION}; docker build -f com.valvesoftware.SteamRuntime.Sdk-amd64,i386-sniper-sysroot.Dockerfile -t steamrt_sniper_amd64:latest .)
docker run --rm --workdir=/work --volume $(pwd):/work steamrt_sniper_amd64:latest /bin/sh -c "
export PATH=\$PATH:/usr/local/go/bin
export CGO_CFLAGS=-std=gnu99

rm -rf /usr/local/go && tar -C /usr/local -xzf .cache/${GO_VERSION}.linux-amd64.tar.gz

go build -o ${name}_linux_amd64 .
"
Compress the resulting yourgame_linux_amd64 into a zip file and upload it to Steamworks as a build.
Others
- It is strongly recommended to configure your account to allow the download of the Dev Comp package. By replacing the executable in the original location where Steam downloads the game (
steamapps/common/yourgame), you can perform tests that are close to the production environment.